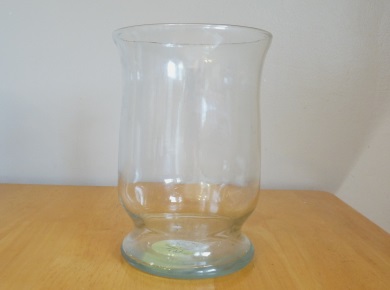
DIY Hurricane Using FrogTape®
This is a Sponsored post written by me on behalf of FrogTape Brand Painter’s Tape. All opinions are 100% mine.
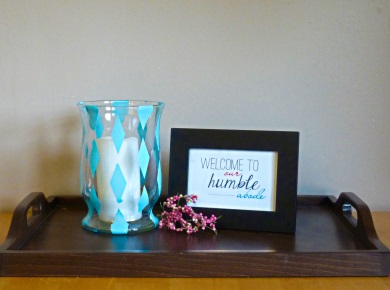
I painted this hurricane using FrogTape® Shape Tape™. It was a little bit challenging at first due to the curvy shape of the hurricane, but once I figured out what I was doing I got on a roll and was able to complete the project fairly quickly.
(FrogTape® is the only painter's tape treated with PaintBlock® Technology. PaintBlock is a super-absorbent polymer which reacts with latex paint and instantly gels to form a micro-barrier that seals the edges of the tape, preventing paint bleed. Check out thisFrogTape how-to for more details.)
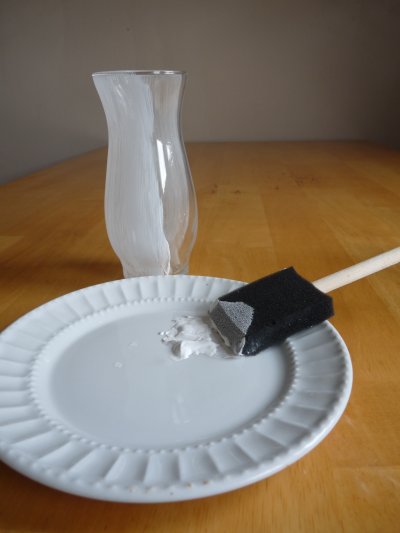
Step 1: Start with a clean, dry hurricane or vase.
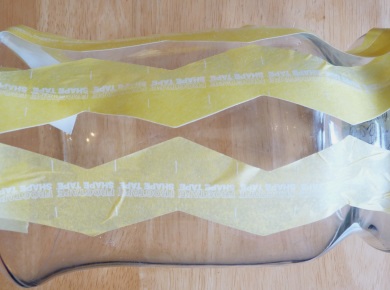
Step 2: Measure and cut pieces of FrogTape® Shape Tape™ to create the design you have chosen. Peel off one half of the backing.
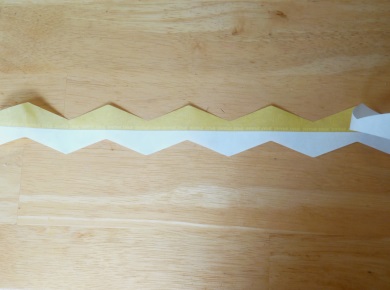
Step 3: Adhere the tape to your hurricane. Continue until you have completed your desired design.
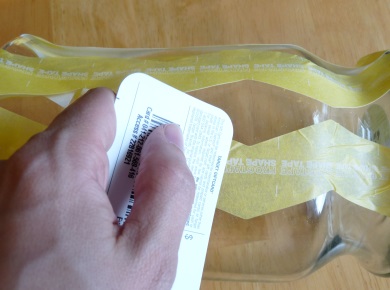
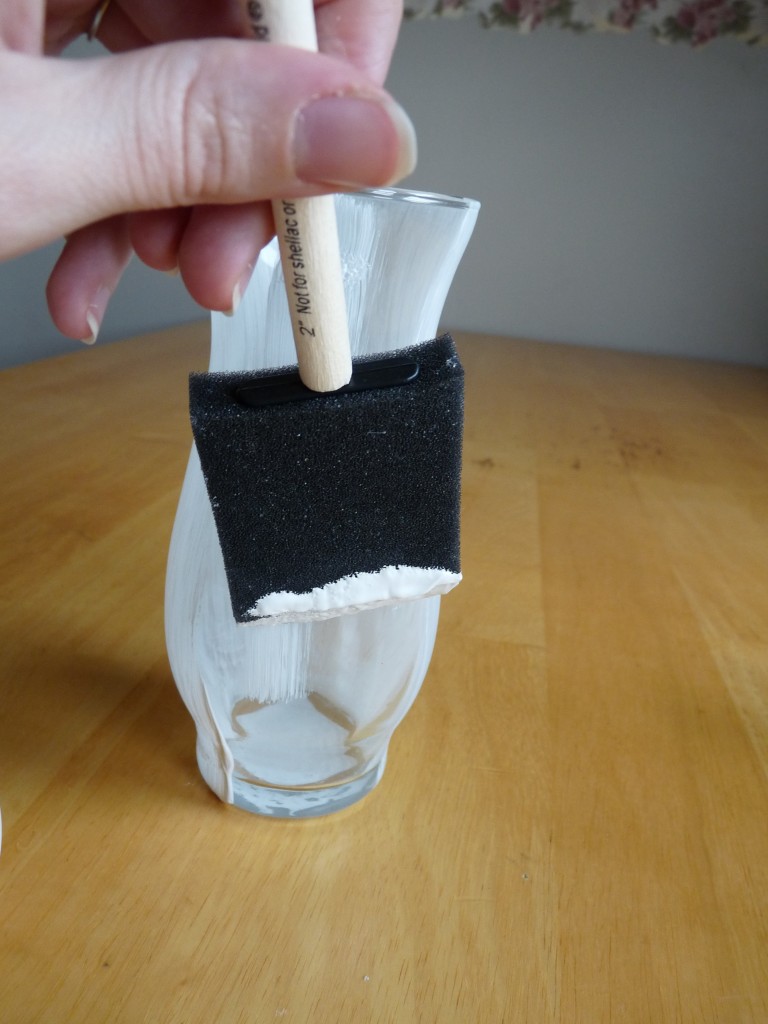
Step 4: Remove the other half of the backing and secure the tape firmly with your fingers. Then use a firm plastic object to smooth the edges of the tape. (I used an old gift card.)
Step 5: Ensure that your design looks exactly like you want it, then paint directly over the tape to fill in the bare design.
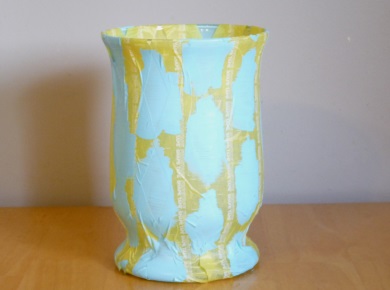
Step 6: After the paint is dry, remove the tape from your project and enjoy the finished product!
I had fun trying out a new project. What project would you like to try using FrogTape® Shape Tape™? You can find tons of creative inspiration when you follow FrogTape® on Twitter @FrogTape!
How to Define Your Home Style
My home has not been redecorated since I got married nearly 8 years ago.
I've been looking around recently and thinking that I would like to redecorate some of the rooms, but I just haven't been able to find a starting place.
I think the biggest reason for that is I just wasn't sure what I liked or what my personal style was.
Something that is helping me tremendously with defining my home style is to look for inspiration on the Havertys website and Pinterest boards.
Once I started pinning things, I could easily recognize what colors my eye is drawn to. I noticed I was pinning cool colors like grays, light blues, and yellows.
I also took the style quiz on the Havertys website and found that many of the images I had pinned showed up as some of my quiz results.
My style was defined as a mix between cottage and eclectic.
Cottage was defined as:
You are casual and informal. You eschew anything that conveys “stuffy” and instead collect items full of charming character. While you have an interest in outdoor activities, your home is a haven
Eclectic was defined as:
You are independent with a broad range of interests. An artistic original, you are creative, intelligent and capable. You break with conformity.
Both of those definitions are pretty accurate and convey the style that I want in my home.
So, although I felt lost at first, I now have a really good idea of my personal home style. I know what colors and styles I want to look for. It was a lot easier than I thought once I collected the images that attracted my eye all in one place!
Visit Havertys.com to take your own style quiz or to find a store near you. (They're currently running a St. Patrick's Day sale, so it would be a great time to stop in!) I'd love to know what your quiz results are!
Havertys is also hosting Home Fashion Workshops. The next workshop, to be held April 12, will be on the theme “Staycation” and you'll learn how to create three different looks: Calm, Cozy, and Coastal. Sounds like fun!
You can find lots more home design inspiration on their Twitter, Facebook, or Pinterest accounts, as well on the Havertys blog.
Havertys helps you bring your vision to life. Visit Havertys.com to find a store near you, deatiled product information and design tools that will truly inspire you.
This is a sponsored conversation written by me on behalf of Havertys. The opinions and text are all mine.
Pretty Winter Vase
 I just recently found out about the Dollar Tree Value Seeker's Club through a friend’s blog. She had done the cutest craft that she found on there.
After my Christmas decorations came down, I knew I wanted to make something to make my house look pretty for the rest of the winter. The Dollar Tree Value Seeker's Club was the perfect place to look! The free club has new ideas every month that you can print and take with you to the Dollar Tree as a shopping list. They had some great ideas for January, so I was really excited to have the opportunity to create one of their projects as part of a sponsored campaign.
I decided to make a pretty winter vase. I figured it wouldn’t be too hard, and I knew I could find some fillers for it out of my backyard. I headed to Dollar Tree and found this vase that was a nice shape, brought it home, and got to work using the instructions on the Dollar Tree Value Seeker's Club website. 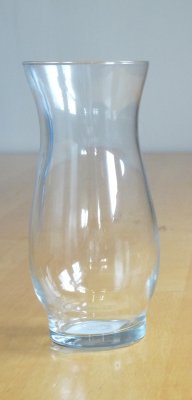
I was so excited that this project went so quickly and easily – I am the queen of finding ways to mess things up and make them take forever! And all I needed was my vase, white paint, white glue, and Epsom salts. I painted the vase white,
let it dry (sort of – I’m a little impatient), then coated it with glue
and applied the Epsom salts. So easy, but pretty! The only thing I did differently from the instructions on the website was instead of rolling the vase in the Epsom salt, I ended up sprinkling it on after I applied the glue. I found that rolling the vase in the salt was scratching the paint off of it. That may have been because I was too impatient to let it dry well enough. But sprinkling it on went very fast, and I had complete control over getting it exactly where I wanted it, so I was fine with doing it that way.

I am so happy with how this project turned out, and I’m enjoying having my house a little less dreary for the rest of the winter.
Be sure to sign up for the Dollar Tree Value Seeker's Club for access to the instructions for this project and lots more like it! I already bought the supplies for another easy decoration that I plan to make for my bedroom.
What project do you think you would like to try first?
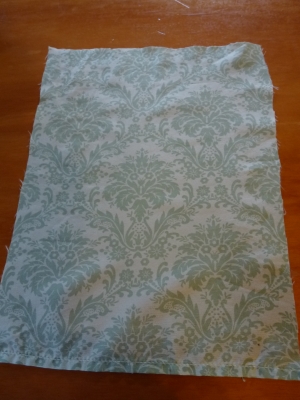
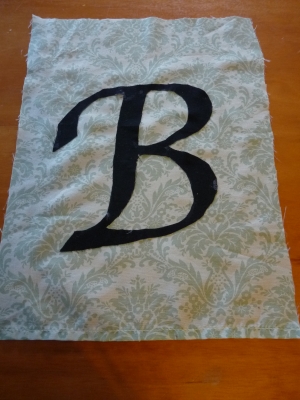
Framed Fabric Monogram
Disclosure: The materials for this Framed Fabric Monogram as well as compensation for this post were provided by Martha Stewart/Plaid Crafts and Blueprint Social.

You all may know by now that I'm not the most artistic person in the world. However, I still enjoy beautiful things and crafts as much as any other woman. It's just that anything I do has to be pretty much dummy-proof or I will find some way to mess it up!
When I found out that I would have the opportunity to try out items from the Martha Stewart Decoupage line, I immediately thought of an easy project that even someone like me could complete.
First, here are all the goodies I recieved:
 There were so many craft possibilities with all of the lace trims, fabric cutouts, and different finishes of decoupage. All of the Martha Stewart decoupage products are available at Michael's.
The supplies I used for this craft were:
- Martha Stewart fabric-to-fabric decoupage (I used the matte finish)
- Martha Stewart decoupage brushes
- Fabric of choice (I used a sheet I found at the thrift store)
- Card stock
- Picture frame
Here's how I did it:
First, I found a font that I liked and printed it off on the computer.
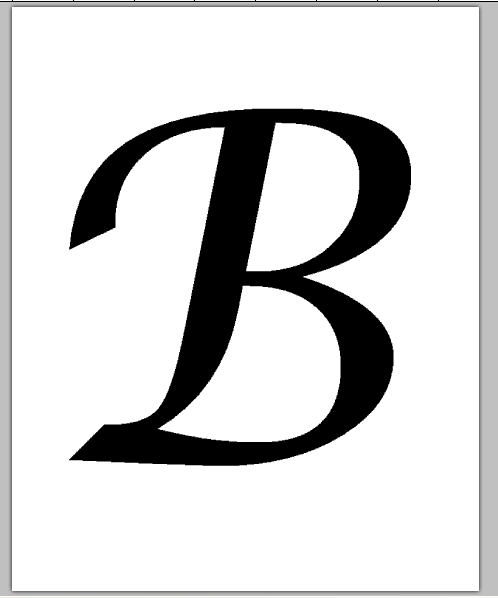
I cut it out and used it as a template to cut out an identical piece of black fabric.
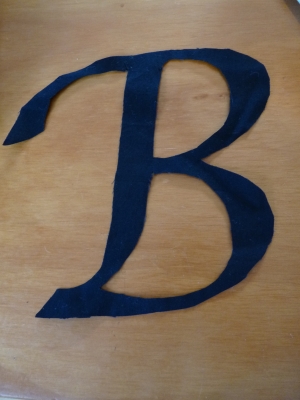
Next I used a piece of card stock as a template to cut my base fabric the right size.
I applied a layer of decoupage on the back of the monogram and adhered it to the center of my base fabric.
Then I applied several coats of decoupage over top of the whole thing to seal it. I did this several times, giving it a couple hours of drying time in between.
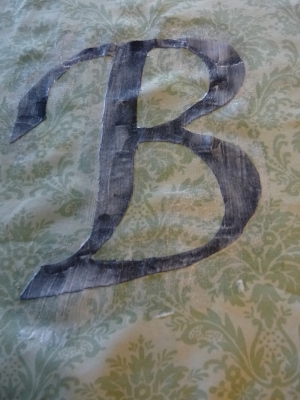
Finally, I adhered the entire thing to a piece of card stock and stuck it in a frame. I opted to leave it without the glass so that the texture of the fabric could be more prominently displayed. (By the way, this is a great way to use thrift store frames that are missing their glass!)

That was it! Done quickly and easily! If I can do it, anyone can!
Be sure to follow Plaid for lots more ideas:
Blog :: Facebook :: Twitter :: Pinterest
You can also check out what other bloggers are doing with the Martha Decoupage products:
Pretty Frosted Glass Door
Our house is quite old, and there are a whole lot of things about it that are definitely less than perfect. But we are so thankful for it, and we're doing the best that we have with what we've got.
Our driveway is laid out in such a way that pretty much forces everybody to come to the back door. Before you get to the kitchen door you have to go through a glass door into the laundry room. If I know somebody is coming, I will of course have the laundry room cleaned up a little bit, but when I'm just going through my daily routine, there may be piles of laundry out there, the floor may be dirty, etc. If the mail carrier or UPS driver comes up to leave something on the porch, they get a full view of the inside of my laundry room, regardless of what it may look like at the time.

And if I happen to be out there doing laundry when somebody unexpected comes to the door, I may not exactly feel like being seen, depending on my appearance at the time.

We used to keep a curtain on the door, but once we had kids, that made things look even worse than they already did. They would pull it off of the door, and they got little baby snot stains all over it.
We wanted to put frosting paint on it to provide some privacy, but we didn't want the entire thing covered. We wanted to think of a way to create some sort of design on it, but we didn't want to create a huge, time-consuming project for ourselves. My mom suggested making a diamond pattern since that could be made with straight lines. That was a great idea, but I wanted to use really thin tape so that the un-frosted part would not be thick enough for people to easily see through the door. The only problem was that we couldn't find anything like that anywhere.
One day I was at an indoor yard sale that our town has (it's like a giant thrift store, but everything is just thrown on tables or in boxes and nothing is priced). I spotted this and I knew immediately that it was exactly what I was looking for. They charged me a whopping 33 cents for it!

I didn't even know what this stuff was, but my mom said it's for using with typewriters. Okay then, that's why I didn't know. I did a search, though, and you can still buy this stuff on Amazon. Now you know where to get it if you decide you want to do a door like mine! 🙂
Once I found that, we got to work right away procrastinated forever on designing our door.
We finally got to it this last weekend, and I am so glad it's done!
Here's how we did it:
First, we washed the door thoroughly, inside and out. We just used vinegar water. I'm not sure if a commercial cleaner might leave a residue that would interfere with the paint sticking.

We started our diamond design by making an “x” corner to corner on the door. We used our fingernails and really made sure the tape was secured tightly to the door. After we added each piece of tape, we numbered them so that we would know the order in which to take them off.

Then we measured 5 inches away from each line and placed another piece of tape top to bottom on the door.

We continued to measure 5 inches away from each line and place new lines diagonally top to bottom. We used a dry erase marker on the outside of the door to mark our 5 inch measurements. We made a mark at the top and bottom of where each piece of tape should go, then matched the tape up to the mark on the inside of the door. By matching up the marks at the top and bottom, we were able to keep our lines perfectly straight.

Here is the door after we finished taping off our design. It was getting dark – it took a lot longer than I thought it would.

Then we taped off the edges of the door and the door handle, and we covered any surrounding areas with newspaper. This picture was taken after the first coat of paint had already been sprayed, which is why it's kind of hazy. I was dealing with a dirty diaper at the time, and my poor husband did not realize that the laundry room windows could be opened. I really don't recommend spraying without the windows open!

This is what we were spraying on the door. I'm not sure if my husband sprayed two coats or three, but I do know that it took two entire cans of paint. (They don't sell this particular brand on Amazon, but this is the same thing. Buy it here.)

We let the paint dry for just a few minutes before we removed the tape. We didn't want to let it dry too much for fear it would crack when we pulled the tape. It was completely dark by the time we got done. You can see how nice it's going to be to be able to be in the laundry with the light on at night and not have people able to see straight inside our house!

Now the mailman can leave packages on our porch without getting a scary view of me in my PJ's!

It's really hard to get a good shot of it because of the glare. The lines came out perfect – no seeping of the paint anywhere even though it sort of looks that way in the pictures. I'm very happy to finally have some privacy in my laundry room, and I'm excited that it looks pretty as well!

Update: I just discovered this frosted glass film on Amazon! It seems like it might be easier to just stick the film on than to tape everything off and spray it. Plus you don't have to worry about the spray paint getting chipped off if you use an adhesive film.

Anti-Procrastination Challenge: Fall Decorating

I'm sure that for a lot of you, putting up fall decor is not something that would cause you to procrastinate. There are so many talented people out there when it comes to that kind of thing, and you enjoy it so much that putting it off is not even a temptation.
I'm a little different. I love looking at the pretty decor, but I hate the process of actually putting it up.
I have a hard time figuring out how to make stuff look good in the first place. Then there's the matter of the messes the kids are going to make while I'm fiddling with decorating, the laundry that needs to be folded, the dishes that need washed (again!), and the diapers to change. If I start decorating, all the other work is just going to pile up and I'm not even going to enjoy the decor because of looking at all the messes. See? I get overwhelmed just thinking about it.
But, like I said, I do love getting to look at the pretty decor, and I get really sad whenever I realize that a season has just passed and I never even got out my decorations. Since hiring someone to come decorate for me isn't exactly an option, what am I to do?
I figured I would start with something simple. Candles are easy, as well as wreaths if they're already made. I also keep ready-made faux floral arrangements for the different seasons so that I can just set them out. I may not be able to arrange a mantle (or fantle), change out all the pictures on the walls, and put fall accents in every room of the house, but I can do a few quick and easy things that will still make a difference and set the mood for the new season a little bit.
I've already been burning a fall candle every day, and today I pulled out my wreaths and hung them up. That took all of 60 seconds! Yup. I have no excuse to procrastinate on that one.

If you're a little like me and don't really enjoy the actual process of decorating, my challenge to you is to think of at least one thing that you can do that's quick and easy. You'll be glad you did!
If you're the type that loves to decorate and could do it all day long, I've got a different challenge for you. But make sure you clear your schedule because it involves coming over to my house. 🙂
If you’re just joining the Anti-Procrastination challenge, you may want to subscribe to email updates or follow me on Facebook to receive each new challenge!